Monday, June 24, 2013
Building a major MOC using LEGO - Part 5: The finishing touches
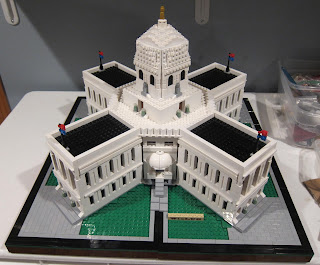
All of the sections are complete and the time has come to pull everything together. As with most major MOCs, I designed this to be pulled apart for transport. It's a great way to pack something like this up in a few boxes and minimize the space needed for moving. Of course, there's still a little bit of work that's needed to bring everything together and see how it looks before sending it off to the show.
Finishing up work on a major project leaves me with some mixed feelings. On the one hand, I'm extremely happy to be able to move on to something else and make new plans. On the other, it's been such a time consuming process, that it feels a little strange not to be working on this design anymore.
Oh well, let's wrap this up.
My original plan was to have everything standing alone on four identical baseplates, which could then be fit together easily and capped off with a dome. Sadly, the need to angle portions of the build made that pretty much impossible. Instead, I went with the Capitol wings tied together to a central building and the dome placed on top. The baseplates could then be on their own, tied together with a central plate and a 4x4 turntable acting as a central pivot point to help line up the X of the building on the square.
As for the actual process of bringing those pieces together, the wings are attached using a mix of plates. The 8x8 with a corner cut plates are perfect for creating the angle I was looking for. The inner wall sections with a staircase were mounted using 2x2 turntables on the top and bottom. This had an added bonus of giving me some room to work with when lining up those sections with the tiles on the main base.
The central section of the building is largely hollow, primarily because I was worried about weight. A trick I used to help keep that weight down and reduce the need to build large support pillars came courtesy of my daughter's LEGO box. Using DUPLO bricks to build the inner support columns was a huge help in spreading out the weight of the roof, while reducing the need to use a ton of regular sized bricks. One DUPLO 2x4 is equal to eight standard 2x4 bricks, so that was big help. A few layers of plates on the roof helped tie everything together and the dome rests right on top. I have to say, I was pretty happy with the finished product.
I'm obviously a little behind on getting this wrapped up, since Brickworld Chicago is a little over a week past at this point. The MOC was done before then though and here's a picture of it on display at the show.
Sadly, only one member of the LUG was able to get another building done, so our downtown landscape did not turn out as grand as I had hoped. Still, my build was always meant to stand on its own if needed. It was nowhere near as large as many of the builds I was able to see in Chicago (more on those later), but I'm still happy with the results of what really was my first major project of my own design.
Thanks for following along with me on this process. On to bigger and new things!
Check out previous installments of this series: Part 1 - Part 2 - Part 3 - Part 4
Labels:
MOC
Subscribe to:
Post Comments (Atom)


Good idea with the Duplo! Great job on the dome, the large curvy structures are never easily replicated in Lego! Kind regards, Brian.
ReplyDeleteThanks! The Duplo idea came from a LUGmate. It was a super useful method for filling in the empty spaces that are not visible once the roof is in place.
DeleteLooks awesome, Andrew!
ReplyDelete